Showing posts with label HTML. Show all posts

Monday, 3 November 2014

Accordion with active header colour

I noticed this nice style from a control vendor and have recreated the accordion in a similar style.

accordion

Demo: 

If the animation is struggling in the iframe above check out the demo in a new page:

http://stevenhollidge.com/blog-source-code/accordion

Code:

Nice breadcrumb UI

image

image

Ok so the colours need changing but it’s a nice little design.

Demo:  http://stevenhollidge.com/blog-source-code/breadcrumbs

Code:

Tuesday, 20 May 2014

Text overflow ellipsis

Adds an ellipsis if the text is longer than the available space.

<html lang="en">
<head>
<meta charset="UTF-8">
<style>
p {
text-overflow: ellipsis;
white-space: nowrap;
overflow: hidden;
Width: 150px;
}
</style>
</head>
<body>
<p>This text is longer than the space allows</p>
</body>
</html>

Thursday, 15 May 2014

Rotating tiles in jQuery

Click on the tiles on the right hand side to rotate.

Demo

The Code

<!DOCTYPE html>
<html>
<head>
<meta charset='UTF-8'>
<title>Rotating Tiles</title>
<style>
#block-1 { background: #d5fcff; }
#block-2 { background: #e1ffd5; }
#block-3 { background: #ffffd8; }
#rotator > div {
position: absolute;
overflow: hidden;
-webkit-transition: all 0.5s ease;
-moz-transition: all 0.5s ease;
-o-transition: all 0.5s ease;
}
#rotator .active { top: 20px; left: 20px; width: 580px; height: 280px; }
#rotator .non-active-top { top: 20px; left: 620px; height: 130px; width: 320px; }
#rotator .non-active-bottom { top: 170px; left: 620px; height: 130px; width: 320px; }
</style>
<script src='http://ajax.googleapis.com/ajax/libs/jquery/1.4.4/jquery.min.js'></script>
<script>
// DOM Ready
$(function() {
var current;

function rotate() {
if (current == 1) {
$("#block-1").removeClass().addClass("active");
$("#block-2").removeClass().addClass("non-active-top");
$("#block-3").removeClass().addClass("non-active-bottom");
} else if (current == 2) {
$("#block-1").removeClass().addClass("non-active-bottom");
$("#block-2").removeClass().addClass("active");
$("#block-3").removeClass().addClass("non-active-top");
} else {
$("#block-1").removeClass().addClass("non-active-top");
$("#block-2").removeClass().addClass("non-active-bottom");
$("#block-3").removeClass().addClass("active");
}
}

$("#rotator div").click(function() {
current = this.id.substr(6);
rotate();
});
});
</script>
</head>

<body>
<div id="rotator">
<div id="block-1" class="active"></div>
<div id="block-2" class="non-active-top"></div>
<div id="block-3" class="non-active-bottom"></div>
</div>
</body>
</html>

Originally taken from the website:   http://css-tricks.com/examples/RotatingBlocks/

Monday, 12 May 2014

Animating Angular Wizard

I have added a nice fade animation to each step of the wizard I created in my previous blog post.

Watch the video below or try out the live demo:

It turned out to be very simple indeed:

1) Add a script reference to the Angular-Animate.js library in your html page

2) Create an Animate.css file which will contain your animation details and add a reference within your html page.  I’ll explain the content of this code in a second.

3) Add a css class to the area you are animating, this is so your css code can locate it.  I added “fade-animation” class to each of the three wizard steps.

4) Finally add a reference to ngAnimate for Angular

And that’s it.  Right, now for the trickiest part, here is the animate.css code:

.fade-animation.ng-hide-remove {
-webkit-transition:all linear 0.5s;
-moz-transition:all linear 0.5s;
-o-transition:all linear 0.5s;
transition:all linear 0.5s;
display:block!important;
}

.fade-animation.ng-hide-add.ng-hide-add-active,
.fade-animation.ng-hide-remove {
opacity:0;
}

.fade-animation.ng-hide-add,
.fade-animation.ng-hide-remove.ng-hide-remove-active {
opacity:1;
}

When you break this down there’s not much to it.  The first section is saying I want the animation to take half a second, in all the various browsers.  The display:block!important line is telling angular to override it’s default for hiding.

The other two css setters simply show and hide.  Now the interesting bit is the css selectors.  You’ll recognise the fade-animation selector as our class we are using for identification purposes. 

All the ng-hide-* css classes are what Angular adds as it cycles through its event lifecycle for showing and hiding.

This would be the lifecycle for moving for the user moving from Step One to Step Two:


  • Step One section is hidden:  ng-hide-add (start) then ng-hide-add-active (complete)
  • Step Two is no longer hidden:  ng-hide-remove then ng-hide-remove-active
Angular dynamically adds and removes these classes to the sections as it cycles through the events.  There’s lots more to animations but this makes for a nice simple introductory example.

Source code

Sunday, 11 May 2014

Angular-Wizard Example

I’ve been playing around with Angular-Wizard, it’s really simple and easy to use.

My online demo featuring bootstrap and Microsoft Modern CSS

Source for my demo

image

<section ng-app="wizard-sample" ng-controller="WizardCtrl" ng-cloak>
<wizard on-finish="finished()" >

<wz-step title="Step One">

... put your html here...

<a wz-next>Next</a>
</wz-step>

<wz-step title="Step Two">

... put your html here...

<a wz-previous>Previous</a>
<a wz-next>Next</a>
</wz-step>

<wz-step title="Finish">

... put your html here...

<a wz-previous>Previous</a>
</wz-step>

</wizard>
</section>

Here is the Official online demo from the creator of Angular-Wizard, who did a great job on this project.

Sunday, 10 March 2013

JavaScript chart

Quick chart using a JavaScript library called HighChart.

Online demo:  http://stevenhollidge.com/blog-source-code/javascriptchart/

Source code

<html>
<head>
<title>JavaScript chart</title>

<script type='text/javascript' src='http://ajax.googleapis.com/ajax/libs/jquery/1.3/jquery.min.js'></script>
<script src='http://code.highcharts.com/highcharts.js'></script>
<script src='http://code.highcharts.com/modules/exporting.js'></script>

<script>
$(function () {
var chart;
$(document).ready(function() {
chart = new Highcharts.Chart({
chart: {
renderTo: 'container',
type: 'line',
marginRight: 130,
marginBottom: 25
},
title: {
text: 'Crystal Palace vs Millwall',
x: -20 //center
},
subtitle: {
text: 'Source: http://www.crystalpalace-mad.co.uk',
x: -20
},
xAxis: {
categories: ['83', '84', '85', '86', '87', '88', '89', '90', '91', '92', '93', '94', '95', '96', '97', '98', '99', '00', '01', '02', '03', '04', '05', '06', '07', '08', '09', '10', '11', '12', '13']
},
yAxis: {
title: {
text: 'League Position'
},
plotLines: [{
value: 0,
width: 1,
color: '#808080'
}]
},
tooltip: {
formatter: function() {
return '<b>'+ this.series.name +'</b><br/>'
this.x +': '+ this.y +'°C';
}
},
legend: {
layout: 'vertical',
align: 'right',
verticalAlign: 'top',
x: -10,
y: 100,
borderWidth: 0
},
series: [{
name: 'Crystal Palace',
data: [35, 38, 35, 29, 30, 30, 27, 15, 3, 10, 20, 21, 19, 23, 26, 20, 34, 35, 41, 30, 34, 26, 18, 26, 32, 25, 35, 41, 40, 37, 24]
}, {
name: 'Millwall',
data: [61, 53, 46, 39, 40, 25, 10, 20, 29, 39, 27, 23, 32, 42, 58, 62, 54, 49, 45, 24, 29, 30, 30, 43, 54, 61, 49, 47, 29, 36, 40]
}]
});
});

});
</script>
<head>
<body>

<div id='container' style='min-width: 400px; height: 400px; margin: 0 auto'></div>

</body>
</html>

Responsive design main menu

Responsive design main menu to window resizing.

image

image

image

image

Online demo:  http://stevenhollidge.com/blog-source-code/responsivedesignmenu/index.html

Same HTML, responsive design using CSS media queries.

Wednesday, 23 May 2012

Reporting Test Tool

This app was developed to regression test Crystal Reports. The data for the reports is taken from two SQL databases, a before and after the upgrade version. Reports are generated from both databases and exported to HTML. The user then clicks on the HTML report template to select what objects they wish to be compared during the testing. SQL profiling technology is used to also show the user the slowest sql statements whilst running the reports.

For a better quality video watch it here:  https://vimeo.com/stevenhollidge/reporting-test-tool

Tuesday, 1 May 2012

PDFs in Silverlight

Displaying PDFs

Your three main options are:

  1. Use the native web browser control in Silverlight, which requires a few hoops to jump through

  2. Use a free third party HTML content control, the example I show is the free control from DivElements

  3. Use a commercial third party HTML content control which is more robust, Infragistics is a good option.

Approach #1: Native Silverlight Web Browser control

To view PDFs in Silverlight you need to run the application with elevated permissions.  This can be done in browser but for this simple example I’ll show how to display PDFs in a Silverlight application running “out of browser”.

The key is the WebBrowser control that automatically hosts an Adobe Reader plugin, which is required to be installed on the client machine.

First create a Silverlight Application and update the MainPage.xaml file with a WebBrowser control and set the source property:

<UserControl x:Class="PdfsInSL4.MainPage"
xmlns="http://schemas.microsoft.com/winfx/2006/xaml/presentation"
xmlns:x="http://schemas.microsoft.com/winfx/2006/xaml"
xmlns:d="http://schemas.microsoft.com/expression/blend/2008"
xmlns:mc="http://schemas.openxmlformats.org/markup-compatibility/2006"
d:DesignHeight="250"
d:DesignWidth="500"
mc:Ignorable="d">

<Grid x:Name="LayoutRoot">
<WebBrowser Source="http://stevenhollidge.com/cv/SJHAP-CV.pdf" />
</Grid>
</UserControl>


For this example I’m using my online CV as the sample PDF file.  If you run the application now you’ll see the browser is blocked.


1


In the project properties check “Enable running application out of browser” and click the “Out-of-browser Settings…” button and check the “Require elevated trust when running outside the browser:


0


Now when you run the Silverlight application you can right click and get the “Install {application name} Application onto this computer…” option.


2


3


Once the application is installed with elevated trust your web browser control will load the PDF.


4


Printing PDFs


The Adobe Reader plugin provides print functionality along with Find, Paging, Zoom, Rotate functionality and more.  Here is the print dialog:


5


Approach #2: HTML Content Viewer Controls

As well as HTML viewers from Telerik and Infragistics there is a third free option from DivElements. Some drawback are whilst it’s free it require the “windowless” Silverlight param property to be set to true and it’s not the most robust control in the world.

Setting Windowless = true (index.html in the example source code)

<body>
<form id="form1" runat="server" style="height:100%">
<div id="silverlightControlHost">
<object data="data:application/x-silverlight-2," type="application/x-silverlight-2" width="100%" height="100%">
<param name="source" value="ClientBin/DivElementTools.xap"/>
<param name="onError" value="onSilverlightError" />
<param name="background" value="white" />
<param name="minRuntimeVersion" value="5.0.61118.0" />
<param name="autoUpgrade" value="true" />
<param name="windowless" value="true" />
<a href="http://go.microsoft.com/fwlink/?LinkID=149156&v=5.0.61118.0" style="text-decoration:none">
<img src="http://go.microsoft.com/fwlink/?LinkId=161376" alt="Get Microsoft Silverlight" style="border-style:none"/>
</a>
</object>
<iframe id="_sl_historyFrame" style="visibility:hidden;height:0px;width:0px;border:0px"></iframe>
</div>
</form>
</body>
</html>

MainPage.xaml

<UserControl x:Class="DivElementTools.MainPage"
xmlns="http://schemas.microsoft.com/winfx/2006/xaml/presentation"
xmlns:x="http://schemas.microsoft.com/winfx/2006/xaml"
xmlns:d="http://schemas.microsoft.com/expression/blend/2008"
xmlns:divtools="clr-namespace:Divelements.SilverlightTools;assembly=Divelements.SilverlightTools"
xmlns:mc="http://schemas.openxmlformats.org/markup-compatibility/2006"
d:DesignHeight="300"
d:DesignWidth="400"
mc:Ignorable="d">

<Grid x:Name="LayoutRoot" Background="White">
<Grid.RowDefinitions>
<RowDefinition Height="50" />
<RowDefinition Height="*" />
</Grid.RowDefinitions>
<Grid>
<Grid.ColumnDefinitions>
<ColumnDefinition Width="50" />
<ColumnDefinition Width="*" />
</Grid.ColumnDefinitions>
<TextBlock Height="25"
Margin="10,17,10,10"
Text="Uri:" />
<TextBox x:Name="textboxUri"
Grid.Column="1"
Height="25"
Margin="10"
Text="http://stevenhollidge.com/cv/SJHAP-CV.pdf" />
</Grid>

<divtools:HtmlHost Name="htmlHost"
Grid.Row="1"
SourceUri="{Binding ElementName=textboxUri,
Path=Text}" />
</Grid>
</UserControl>


Vendor: http://www.divelements.co.uk/silverlight/tools.aspx

Online demo: http://stevenhollidge.com/blog-source-code/pdfs/

Example source code: http://stevenhollidge.com/blog-source-code/PdfsInSilverlight.zip


Approach #3: Infragistics HTML Content control


http://samples.infragistics.com/sllob/html-viewer/sl/#/navigating-and-custom-html

Wednesday, 18 January 2012

JavaScript MVVM: Knockout.js

Knockout.js is a rich JavaScript MVVM framework for data binding HTML elements to JavaScript view models, auto UI updates, dependency tracking and templating.

For a Silverlight or WPF developer this is just what we’ve wanted to be able to unit test our presentation layer (the View Model) outside of the UI.

MVVM

Overview

image

Example of an implementation of MVVM

MVVM_05

Knockout.js

Home page http://knockoutjs.com/
Source code: https://github.com/SteveSanderson/knockout
Resources: http://www.knockmeout.net/   
http://blog.stevesanderson.com
http://en.wikipedia.org/wiki/Model_View_ViewModel


A simple Knockout.js example

 image

Live demo:  http://c9.io/stevenh77/knockoutdemo/workspace/demo1.html

In this example we will be:

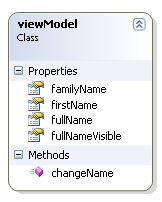
Diagram

Steps

image 1. Creating a view model in JavaScript called viewModel (see diagram).
2. Three of the properties will be ko.observables which enables data binding:
        firstName, familyName and fullNameVisible
3. firstname and familyName bound to textboxes.
4. Enforce the update of the viewModel properties after every key press by adding:
        valueUpdate: 'afterkeydown'  to the data-bind section of the textboxes
5. Binding the checked property of the checkbox to fullNameVisible along with the label.visible property.
6. Create a fourth dependentObservable property called fullName, which is dependent on firstName
and familyName and databound to “Hello {fullName}” label.

7. Bind the changeName function to the Change Name button, which updates firstName and familyName.

<!DOCTYPE html>
<html>
<head>
<script src="http://cloud.github.com/downloads/SteveSanderson/knockout/knockout-2.0.0rc.debug.js" type="text/javascript"></script>
<script src="https://ajax.googleapis.com/ajax/libs/jquery/1.7.1/jquery.js" type="text/javascript"></script>
<script type="text/javascript">
$(function () {
var viewModel = {
firstName: ko.observable("Bob"),
familyName: ko.observable("Smith"),
changeName: function () {
this.firstName("Joe");
this.familyName("Bloggs");
},
fullNameVisible: ko.observable(true),
};
viewModel.fullName = ko.dependentObservable(function() {
return this.firstName() + " " + this.familyName();
}, viewModel);
ko.applyBindings(viewModel);
});
</script>
</head>
<body>
<div>Stockbroker:
<input type="text" data-bind="value: firstName, valueUpdate: 'afterkeydown'" />
<input type="text" data-bind="value: familyName, valueUpdate: 'afterkeydown'" />
<input type="checkbox" data-bind="checked: fullNameVisible" />
<span>Hello </span><span data-bind="text: fullName, visible: fullNameVisible"></span>
<button data-bind="click: changeName">Change name</button>
</div>
</body>
</html>

Observable Arrays


Here is an example showing lists of data with validating input controls


Live demo:  http://c9.io/stevenh77/knockoutdemo/workspace/demo2.html


image

<!DOCTYPE html>
<html>
<head>
<script src="http://cloud.github.com/downloads/SteveSanderson/knockout/knockout-2.0.0rc.debug.js" type="text/javascript"></script>
<script src="https://ajax.googleapis.com/ajax/libs/jquery/1.7.1/jquery.js" type="text/javascript"></script>
<script src="http://ajax.microsoft.com/ajax/jQuery.Validate/1.6/jQuery.Validate.min.js" type="text/javascript"></script>
<script type="text/javascript">
$(function () {
var TradeModel = function(trades) {
var self = this;
self.trades = ko.observableArray(trades);

self.addTrade = function() {
self.trades.push({
ticker: "",
price: ""
});
};

self.removeTrade = function(trade) {
self.trades.remove(trade);
};

self.save = function(form) {
alert("Could now transmit to server: " + ko.utils.stringifyJson(self.trades));
// To actually transmit to server as a regular form post, write this: ko.utils.postJson($("form")[0], self.gifts);
};
};

var viewModel = new TradeModel([
{ ticker: "MSFT", price: "39.95"},
{ ticker: "AAPL", price: "120.00"}
]);

ko.applyBindings(viewModel);

// Activate jQuery Validation
$("form").validate({ submitHandler: viewModel.save });
});
</script>
</head>
<body>
<form action='/someServerSideHandler'>
<p>You have entered <span data-bind='text: trades().length'>&nbsp;</span> trade(s)</p>
<table data-bind='visible: trades().length > 0'>
<thead>
<tr>
<th>Ticker</th>
<th>Price</th>
<th />
</tr>
</thead>
<tbody data-bind='foreach: trades'>
<tr>
<td><input placeholder='Ticker' class='required' data-bind='value: ticker, uniqueName: true' /></td>
<td><input placeholder='Price' class='required number' data-bind='value: price, uniqueName: true' /></td>
<td><a href='#' data-bind='click: $root.removeTrade'>Delete</a></td>
</tr>
</tbody>
</table>

<button data-bind='click: addTrade'>Add Trade</button>
<button data-bind='enable: trades().length > 0' type='submit'>Submit</button>
</form>
</body>
</html>

Bindings

Built in binding

These bindings come out of the box


Text and Appearancevisible, text, html, css, style, attr
FormsClick, Event, Submit, Enable, Disable, Value, Checked, Options/Selected options (for dropdown or multi select)
Control Flowif, ifnot, foreach, with
TemplateOld:  Traditional JavaScript template (<script>)
New:  Inline, template less, comment based syntax

Custom bindings


Sometimes it’s preferred to use custom bindings over the built in bindings as it can keep your code more reusable and succinct.

ko.bindingHandlers.yourBindingName = {
init: function(element, valueAccessor, allBindingsAccessor, viewModel) {
// This will be called when the binding is first applied to an element
// Set up any initial state, event handlers, etc. here
},
update: function(element, valueAccessor, allBindingsAccessor, viewModel) {
// This will be called once when the binding is first applied to an element,
// and again whenever the associated observable changes value.
// Update the DOM element based on the supplied values here.
}
};

KO Utilities


Knockout protected observable:  Allows you to commit or undo changes to your observable data item, sweet!


Data features


You can use the built in Knockout functions to convert to |JavaScript and JSON:  ko.ToJS() and ko.ToJSON()

var viewModel = {
firstName : ko.observable("Bert"),
lastName : ko.observable("Smith"),
pets : ko.observableArray(["Cat", "Dog", "Fish"]),
type : "Customer"
};
viewModel.hasALotOfPets = ko.computed(function() {
return this.pets().length > 2
}, viewModel)


var jsonData = ko.toJSON(viewModel);

// Result: jsonData is now a string equal to the following value
// '{"firstName":"Bert","lastName":"Smith","pets":["Cat","Dog","Fish"],"type":"Customer","hasALotOfPets":true}'


var plainJs = ko.toJS(viewModel);

// Result: plainJS is now a plain JavaScript object in which nothing is observable. It's just data.
// The object is equivalent to the following:
// {
// firstName: "Bert",
// lastName: "Smith",
// pets: ["Cat","Dog","Fish"],
// type: "Customer",
// hasALotOfPets: true
// }

Loading and Saving JSON Data

$.getJSON("/some/url", function(data) { 
// Now use this data to update your view models,
// and Knockout will update your UI automatically
})

var data = /* Your data in JSON format - see below */;
$.post("/some/url", data, function(returnedData) {
// This callback is executed if the post was successful
})

See the knockout documentation for examples on loading and saving JSON data.


http://knockoutjs.com/documentation/json-data.html

Saturday, 15 October 2011

Google Chart Tools

They are beautiful, easy to use and free - get involved!

Getting started:  http://code.google.com/apis/chart

Chart Gallery:  http://code.google.com/apis/chart/interactive/docs/gallery.html

Playground:  http://code.google.com/apis/ajax/playground

image

image

image

image

image

image

image

image

jQuery Validation

Here is a great jQuery library for flexible client side validation on user data entry. 

Each bubble appears after the user has left the control and on form submission and can check:

  • Required fields, data type, regular expressions, dates, min/max, call out to JavaScript functions etc

image

You can check out the full range of validation online here:  http://stevenhollidge.com/html5demos/validation/

Monday, 11 July 2011

Google PageSpeed & SpeedTracer

Page Speed

Page Speed is an open-source project started at Google to help developers optimise their web pages by applying web performance best practices and is integrated into the Developer Tools within Google Chrome.

As an example, here is one of my Azure hosted websites running SQL Azure backend viewed in Chrome with Page Speed turned on:

ScreenShot082

Speed Tracer

Speed Tracer is a tool to help you identify and fix performance problems in your web applications. It visualizes metrics that are taken from low level instrumentation points inside of the browser and analyzes them as your application runs. Speed Tracer is available as a Chrome extension and works on all platforms where extensions are currently supported (Windows and Linux).

Using Speed Tracer you are able to get a better picture of where time is being spent in your application. This includes problems caused by JavaScript parsing and execution, layout, CSS style recalculation and selector matching, DOM event handling, network resource loading, timer fires, XMLHttpRequest callbacks, painting, and more.

Here’s an example of Speed Tracer:

ScreenShot084

Conclusions

Everyone likes quick wins, by using these tools against your business apps bottlenecks are made visible within your team.  This is a very powerful and necessary part of development, be sure to include performance tests as part of your normal development and release cycle to measure code impact over time.